In reviewing the stuff on the site, I realized that I’m a bit short on a number of the “foundational” techniques. I’m unlikely to add content on welding, since there are a million people who are better at it than I am, but there aren’t a lot of articles out there on riveting – perhaps in large part because everyone welds stuff these days…
I though that it would be useful to provide a quick guide to riveting so that I could just reference this in construction articles and say “use a countersunk leather rivet – here’s a link if you don’t know how to do this” instead of spending a lot of time duplicating material with minor variations across multiple articles. This also gives me a single place to update if I realize that there is another type of rivet that I should add.
Types of Rivets
In general there are 5 basic classes of rivets: these are used to solidly fix plates, allow plates to pivot, or allow plates to move on multiple dimensions. I’ve broken these out from least to most movement:
- Decorative rivets
- Hard rivets
- Countersunk Rivets
- Articulation Rivets
- Sliding Rivets
- Leather Rivets
Note that the last class (Leather Rivets) is really a hard rivet connecting a metal plate to leather: I have made it a separate class here since the type of rivet used is generally different than that used on metal to metal connections since leather is much easier to tear, and there some considerations that need to be kept in mind which are not relevant to metal to metal connections.
Decorative Rivets
There are a number of armours where you will get a line of rivets that don’t actually do anything: the rivet is through a single layer of metal, and is only there to be a decorative element. This reaches it’s ultimate expression on 16th century armour where edges of armour are occasionally embossed to *look* like decorative rivets without actually adding the weight (or effort) of adding real rivets. Decorative rivets will often be countersunk on the inner side to minimize the protrusion of material (and rubbing) on the underlying layer, often another piece of armour or arming clothes. I won’t bother going into detail on these – this is simply a hard rivet without anything to hold together
Hard Rivets
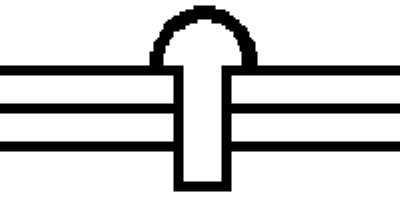
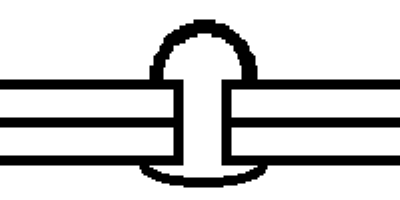
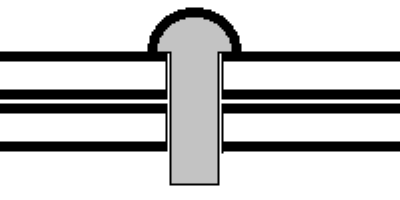
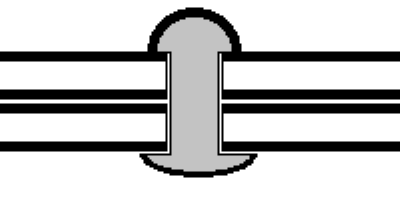
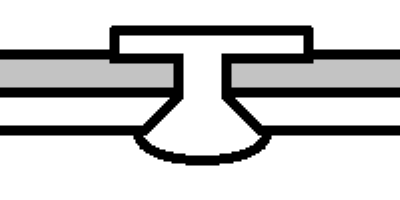
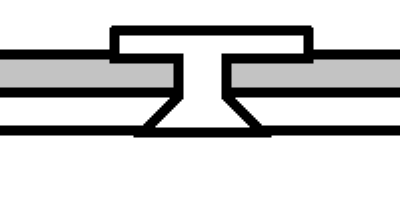
This is the most basic type of rivet: holes are drilled or punched through the layers of material, and a rivet is inserted through the hole and then peaned (smashed) so that the ends clamp the material between them. On most medieval examples this is used on hinges, and the outer plate is commonly countersunk and then ground flush so that the only evidence of the rivet is a faint circle showing where the two metals connect. This is evident since the plate is often heat treated while the rivet is not, so the heat treated (tempered) plate will take a higher polish than the rivet material. The only example that I can think of where the non-headed side is not peaned would be on some 15th century breastplates, where the head is on the outside and the rivet protruding through the inner plate is peaned but not ground flush to the surface of the inner plate. The progression can be seen in the images below. Holes are punched to tightly fit the rivet, the rivet is slid into the holes and then peaned over to clamp the pieces together. as a general rule the “excess” rivet material should be roughly 1.5-2x the thickness of the plates you are riveting together, so if you are riveting 16 Ga (1/16″ / 1.6mm) material you will want 3/32″ to 1/8″ of material protruding (about 2-3 mm).
Countersunk Rivets
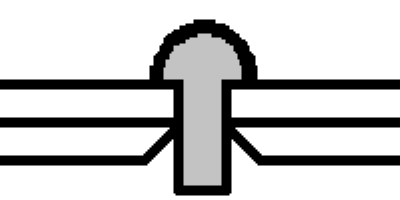
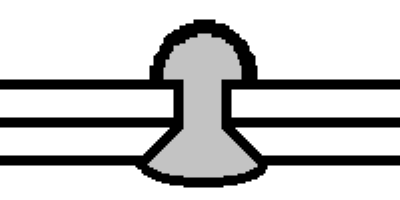
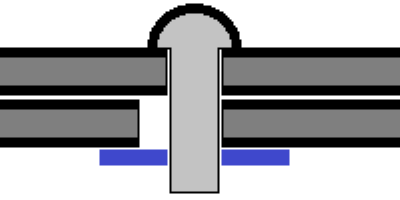
In many cases it is aesthetically important to hide a rivet, and this is common (and almost universal) with leather attachments which are outlined below. You will also find these hidden rivets on hinges and attachment hardware such as spring pins – anywhere that 2 pieces of material need to be connected, but the “line” of the armour needs to be kept clean. This requires the “clean” surface to have something for the metal of the rivet to grip, and is generally accomplished by removing some of the metal on this face (countersinking) and then peaning the rivet material into this cavity. Once the rivet is set, then the excess material is ground away until the rivet is invisible. Since these rivets are often set into hardened steel plates, they are often visible as hardened (tempered) steel will polish to a brighter finish than untreated steel, so a “ring” or a dot can be seen if closely inspected. This is actually a feature, since anytime you need to replace these rivets you can find their center and drill them out (the historical solution would be to drift punch them out, but you would still need to center your tool). As a rule of thumb the excess material should be a bit on the “generous” side, roughly 2x the thickness of the material that is countersunk. For 16 Ga the rivet shank should protrude roughly 1/8″.

Articulation Rivets
One of the most common uses of a riveted connection in medieval armour is to allow two plates to pivot across each other. This type of rivet is commonly found in knee or elbow joints, as well as mitten gauntlets. Since the rivet is acting as the poivot point, much like the pin in a hinge, the geometry of the “swing” is important (but not covered in this article) and enough clearance must be allowed so that the rivet can turn freely in the hole. In general a hole drilled from 1/64″ to 1/32″ (0.4-0.75mm) larger than the shaft diameter of the rivet is sufficient clearance. When assembling this type of rivet, it is important to not “swell” the rivet, so a larger number of lighter strikes is preferable to pean the end.
Sliding Rivets
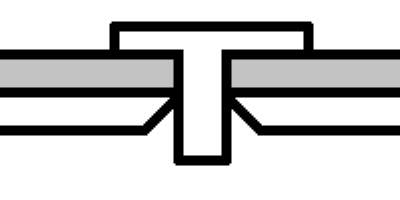
Sliding rivets are a variation of articulation rivets, where one plate has a channel, and the other a simple hole. In general this extends the articulation joint to allow articulation and compression. For some cases (like gothic knee armour, or gauntlet wrist plates) this allows a realignment of the pivot axis, and in others (such as pauldrons and fauld plates) this is to allow movement along the line of the slots, with minor rotation around the rivet. The rivet is treated exactly the same as a regular articulation rivet, but a washer of some type (round for most modern reproductions, historically an octagonal plate) is needed on the peaned end of the articulation rivet. Note in the drawing below the “channel” on the bottom plate, which is not really to scale – this channel is generally on the order of 2-3x the diameter of the rivet for knee or wrist plates, and is often 5x (or more) the diameter of the rivet for pauldron slots.

Leather Rivets
Leather rivets are effectively a conventional rivet with one layer of material being metal, and the second being leather. These rivets are typically countersunk, and a major difference between these rivets and a conventional rivet is that the size of the head used is generally much larger. You can find an article on making these rivets here : http://borealissteel.ca/making-arming-nails/
As with a typical countersunk rivet, punch or drill the holes, countersink the metal face and pean the material into the countersunk hole before grinding (almost) flush. The significant differences to a normal countersunk rivet is that the leather will compress, so the head of the rivet will likely be at (or even slightly below) the surface of the leather on the “inside” and when grinding the excess material you will need to be careful to not (over) heat the rivet material, since this can degrade the leather making it brittle.
Here are a few pictures of some rivets, being sent to a friend in Germany.
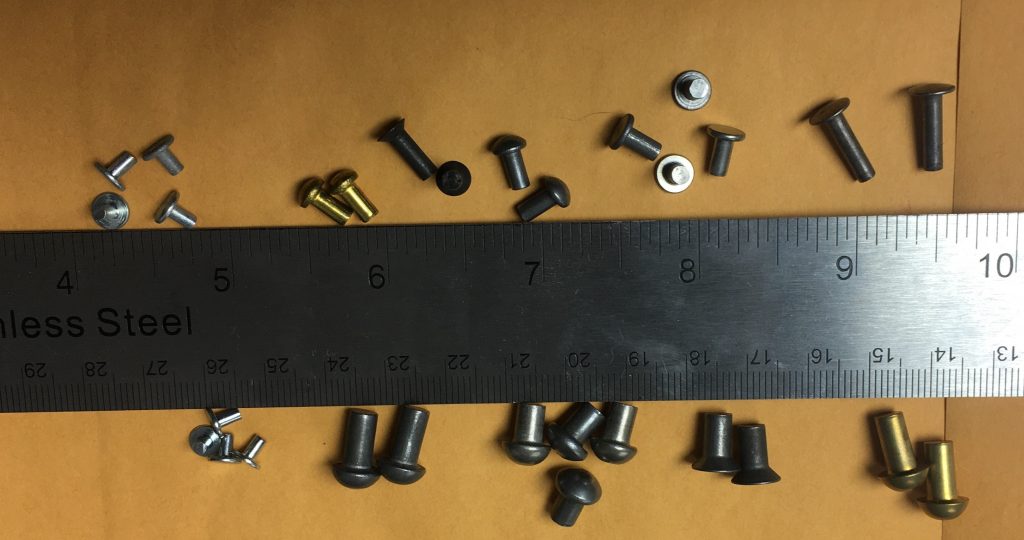
These rivets are:
- Top Row (left to right)
- 14 oz tinners rivets (a hair under 3/32″)
- 1/8″ x 1/4″ roundhead rivets (Brass)
- 1/8″ x 3/8″countersunk rivets (Steel)
- 1/8″ x 1/4″ flathead rivets (Steel)
- 1/8″ x 1/2″truss rivets (Steel)
- 14 oz tinners rivets (a hair under 3/32″)
- Bottom Row (left to right)
- 12 oz tinners rivets (two hairs under 3/32″)
- 3/16″ x 1/2″ roundhead rivets (Steel)
- 3/16″ x 3/8″ roundhead rivets (Steel)
- 3/16″ x 3/8″ countersunk rivets (Steel)
- 3/16″ x 1/2″ roundhead rivets (Brass)